When I was first shown the Permobil M-300 by the salesperson, I raised my concerns about the very flimsy side arms. The side to side play seemed quite excessive and I was concerned about using them for transferring. The salesperson assured me that they would stand up to repeated transfers but promised to swap these arms out for a new model "which would be available in about three months time". In fact I remember the phrase he used "they would be rock-solid!". In recent conversations with a shop technician, I was told that the Permobil M-300 has only two arm styles, both were available at the time of my purchase and the alternative is less stable that the one I currently have. I was lied to in order to have me commit to the sale!!
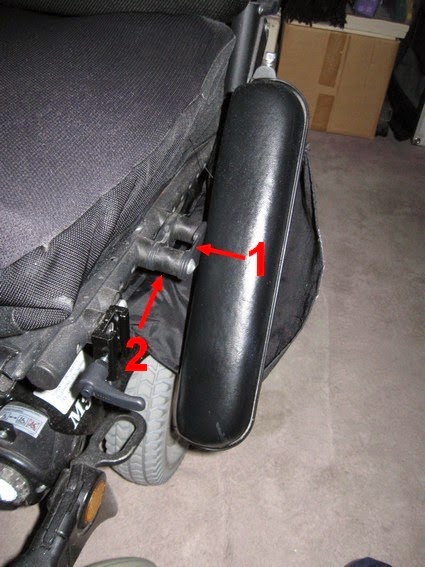
Shown here is the Permobil M-300 forward arm post which should drop into the hole shown by the red arrow. While this photo shows about 3/4 of an inch separation between the center of the post and the center of the locking mechanism (hole), the side to side play is even greater. In fact the post and arm can completely miss the mechanisms and the arm would spin around 360 degrees if not stopped by the floor as shown below.
Here, the Permobil M-300 arm post has completely missed the latching mechanism 1 and has hit the floor. The arm swings equally backwards hitting the floor behind the chair. The stop mechanism which should restrict the arms movement backwards (when raised) is ineffective! By holding onto the arm and transferring to the chair, the stress flexes the bolts attaching the mechanism and eventually the bolt(s) snap. While easy enough to replace, this mechanism is poorly designed by Permobil's engineers and the user should not be repeatedly placed in the position of having to replace the bolt, or for those less capable, or to have a wheelchair repair technician dispatched to do the same, for a price, of course. I was able to obtain comparable bolts from a local hardware supply (Home Depot) however, they had about the same tensile strength and also sheared (snapped) after repeated transfers. Perhaps a titanium bolt from a specialty company would survive longer however the proper solution would be for the Permobil engineers to redesign the post and capture system.
Also shown in the photo are the two round or tubular spacers 2, one of which was lost in transit when the bolt last snapped. The rear arm attachment point is greatly responsible for this side to side play and overall weakness of the arm. I had attempted to improve the rear hinge assembly by adding an aftermarket (Home Depot) oversized metal washer (for stiffness) and a rubber washer (for friction/resistance).
Shown here is the side arms overly complicated rear hinge attachment mechanisms with my exterior (aftermarket) oversized siffening wash and behind it the rubber washer (arrows) which adds some resistance thereby dampening the dropping motion if the arm is released. I believe the silver coloured lever seen on top of the photo is suppose to be used to adjust the tension or resistance of the arm's motion -so it won't drop too fast. I said "I believe" this is its purpose as this has never been effective in dampening the drop and perhaps over tightening the lever cause the mechanism to snap. Unfortunately, Permobil chose to use some sort of plastic resin to manufacture this item which is itself slippery by nature and offered little resistance and being plastic, is very fragile and will break when stressed.
As I mentioned, the last time the locking mechanism's bolt broke, I was in transit and the broken bolt fell out taking the tubular spacer with it, all lost! As the arm, was about to drop off and as I still had some days to work, I took the entire broken arm assembly off of the wheelchair to prevent further damage. (that is, I had no arm on the left side of the wheelchair) In doing so, I found what I refer to as the plastic tensioning spacer, broken into three sections - as they tumbled out to the floor.
This is a photo of what I refer to as Permobil tensioning spacer, shown here broken into three sections. The item is made from some sort of fragile plastic resin and has no internal strengthening structure such as fiberglass or carbon fiber which might give it some three-dimensional strength. Better yet, I could be made of aluminum or some other metal and if too slippery, be coated with some resistive material to add tension. No glue would hold this together so it would have to be replaced.
In the above photo, the transfer arm can be seen extending above the 'M300'. Attached directly to the frame, this is suppose to be stronger or more rigid than using the side arms for transfer. At the time of purchase, the salesperson assured me the arms were strong enough for transfers, as they were found on the wheelchair. Inset is the previous photo showing the location of the broken arm tensioning spacer. A 3/4 inch (outside diameter) tubular metal spacer with a central hole for the 5/16th diameter bolt that holds the arm to the chassis, ran through the curved portion of the plastic spacer.
So here is what happened: I call up my wheelchair service provider, Shopper's Home Healthcare -Bartley Drive Unit, and have the Permobil wheelchair picked up for servicing - I get an old loaner in return.
(The Permobil wheelchair was at the Shopper's Home Healthcare, Bartley Drive Shop for about two months before being returned to me. Much more on that in an upcoming post.)
I have the chair returned after two months and find the broken bolt and lost spacer replaced.
They also attached a 'Transfer Bar' so that I could transfer using this rather than the fragile side arms. This would have been fine with me if it had been discussed with me beforehand - am I agreeable?, will it help me?, what will it cost me?, etc. Two months, really??!!
So below is a very short video clip of what the repair job accomplished.
Basically, this is how the chair was returned to me after two months in the shop.
Below is my solution to this poorly designed and engineered sidearm hinge.
I removed all the plastic segments of the broken arm tensioning spacer and replaced them with large metal washers (2 inch outside diameter with 13/16th hole). I reused the central hub which was previously enclosed by the plastic arm tensioning spacer. The bolt (3&1/2 inch in length, 5/16th diameter, #18 Posi-lok nut) (nylon thread resists loosening). All parts obtained from the local hardware store (Home Depot). Tightening the nut seen on the outside of the unit, passing through the hub (not seen) and washers added whatever tension I wanted and would hold the arm in whatever position I wanted. If I find it too stiff, I plan to get one of those thin cutting sheets available in any 'Dollar Store' or kitchen supply store. I find they are made of a thin, somewhat slippery, plastic which is cuttable. Use the metal washer for a template and cut plastic washer to insert between the metal ones to produce a smoother action. I have found this to be unnecessary at the present time.
If I wish, in the future I can get a block of aluminum from a metal supply company and machine my own fancier version, but for now, this works and performance is all I wanted. The arm has very little side to side play. It is stiff side to side but moves smoothly when raised up and down. There is enough tension that the are will stay raised wherever I might place it. It will not slam down either front or back.
Sadly, this is what passes for service these days....
I will have much more to say about this in upcoming posts.
* * *


.jpg)


No comments:
Post a Comment